
Connect & Configure
1. Log in to your BuzzBoard Demand account using the credentials in the welcome email.
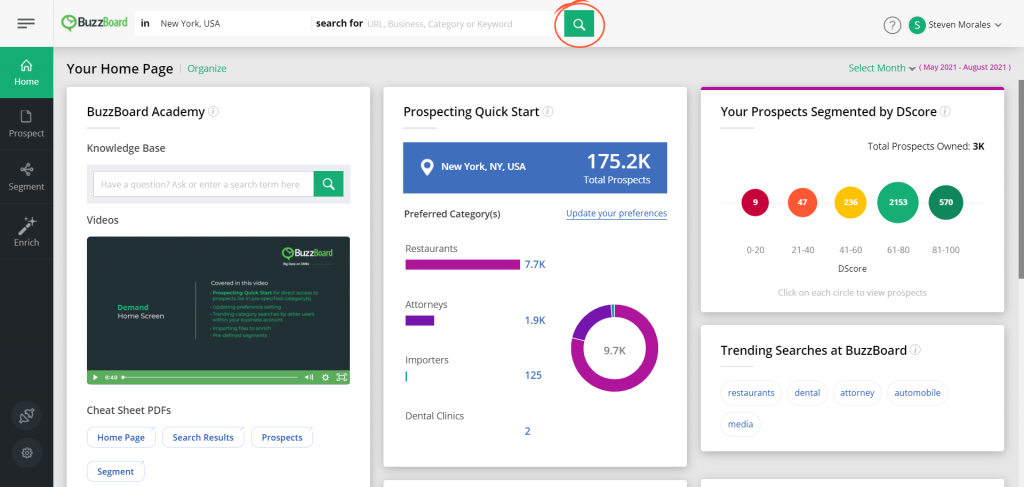
2. After you login, you will land onto the Home Page.
3. Click on the Integrate option on the left navigation panel.

4. You will see the below page. Click on the Salesforce tab.
 You should see the Salesforce tab only if you have admin privileges for your BuzzBoard Demand account. If you do not see the tab, please contact your Account Manager for further assistance.
5. On clicking the Salesforce tab, you will see the below page with Authentication tab and a CONNECT button. Click on CONNECT.

6. When you click on CONNECT, you will be taken to the Salesforce login page, where you need to enter your Salesforce credentials and click Log In.

7. If you’ve entered the correct Salesforce credentials, you will be taken back to the Authentication page. You will also notice a green tick and a message to imply that you have successfully connected to your Salesforce account.

8. At any point in time, if you wish to disconnect your Salesforce account, you can click on the Disconnect link and follow the instructions.

Configure
9. Now that you have connected your Salesforce account, the next step is to configure the enrich process. Click on the CONFIGURE ENRICH PROCESS button.

10. This will take you to the Configuration tab where you will see a 4-point stepper. The stepper is meant to indicate your progress in the configure process.

The above screen denotes the 1st step of the Configure process – Sync. As you can see, Sync is highlighted in the stepper as well.
Step 1 – Sync


Step 2 – Select Signals


Step 3: Map Fields

- The default business fields with corresponding fields in Salesforce
- The selected signals with corresponding fields in Salesforce


9. Once the default fields’ mapping is completed, click on SAVE & NEXT to map the signals selected in step 2

Step 4: Manage Duplicates


- Field Name corresponds to the columns in the Salesforce Leads table.
- Matching Methods has two values – FUZZY (for similar matches) and EXACT(for exact matches)
- Operator has two values- AND and OR. It is the logical operator used to join the sub-filter.


Sync prospects from Demand to Salesforce and enrich your CRM
Now that you have connected your Salesforce account and made all the necessary configurations, it’s time for some action! We support a host of options to choose from that allow you to sync the prospects from Demand to Salesforce.
Option 1: Add new prospects and sync them to Salesforce
1 Enter the desired search criteria in the Global Search Bar and click the search icon.
2 You will be redirected to the Prospects page with the Prospects tab highlighted. This tab displays all the prospects that match the search criteria and have not been added to your Demand account yet.
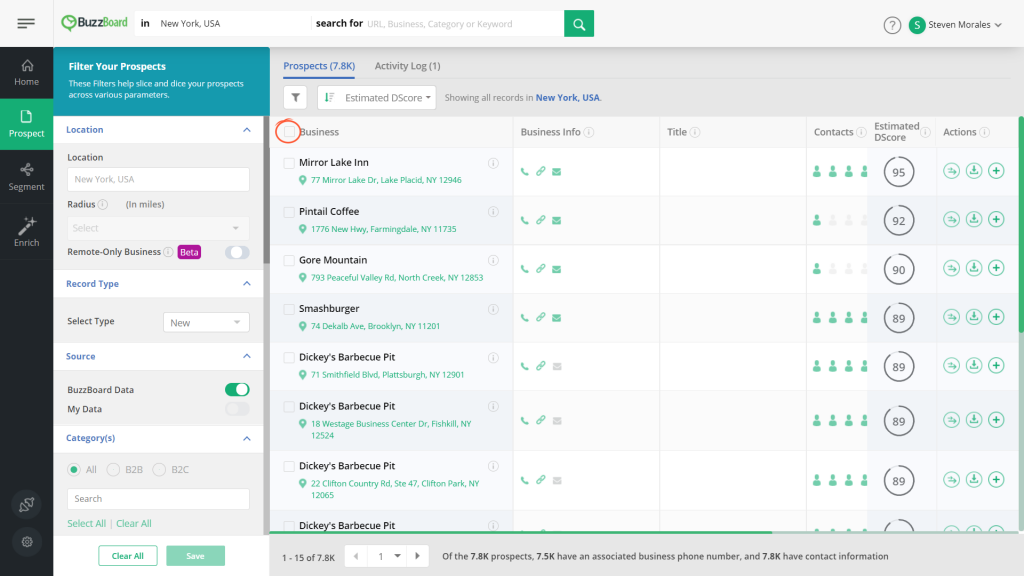
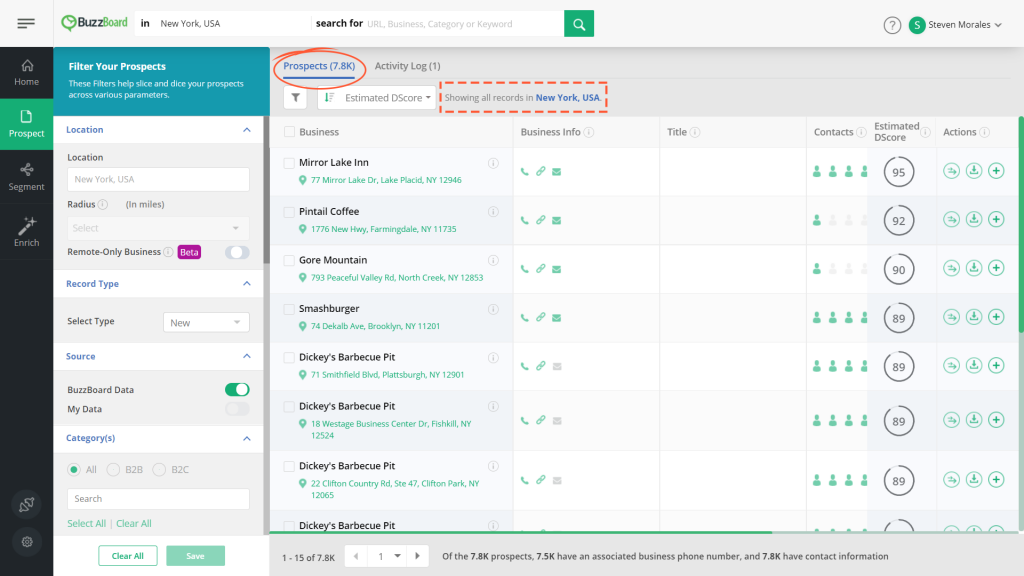 3 To sync new prospects (that have not been added to your account), ensure that the Record Type is New and Source is BuzzBoard Data in the Filter Panel. Click on the checkbox next to Business.
4 You will see an option – Add and Sync to CRM.
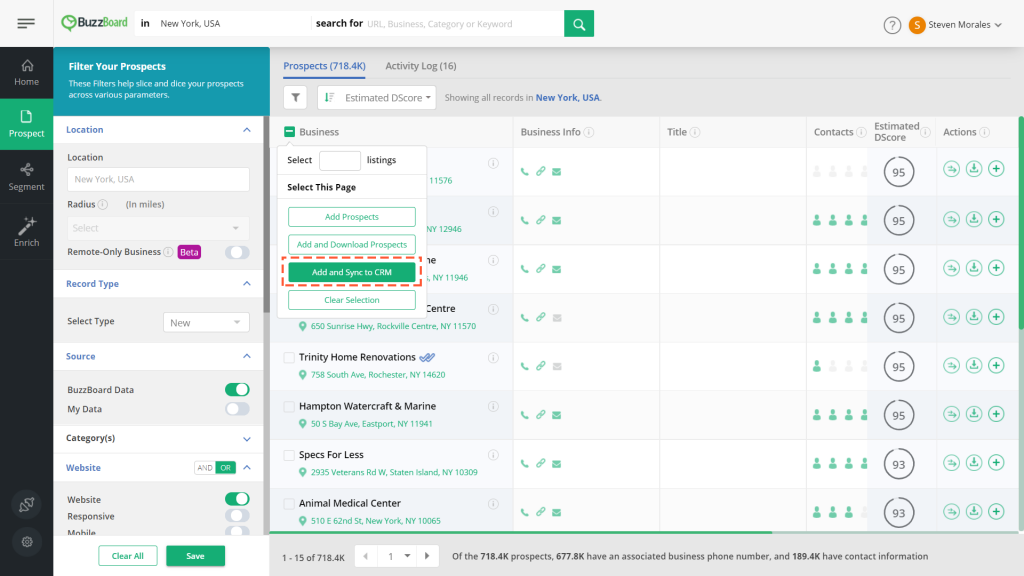
5 Enter the desired number of prospects that you want to add and sync to your Salesforce account. Click the Add and Sync to CRM button.
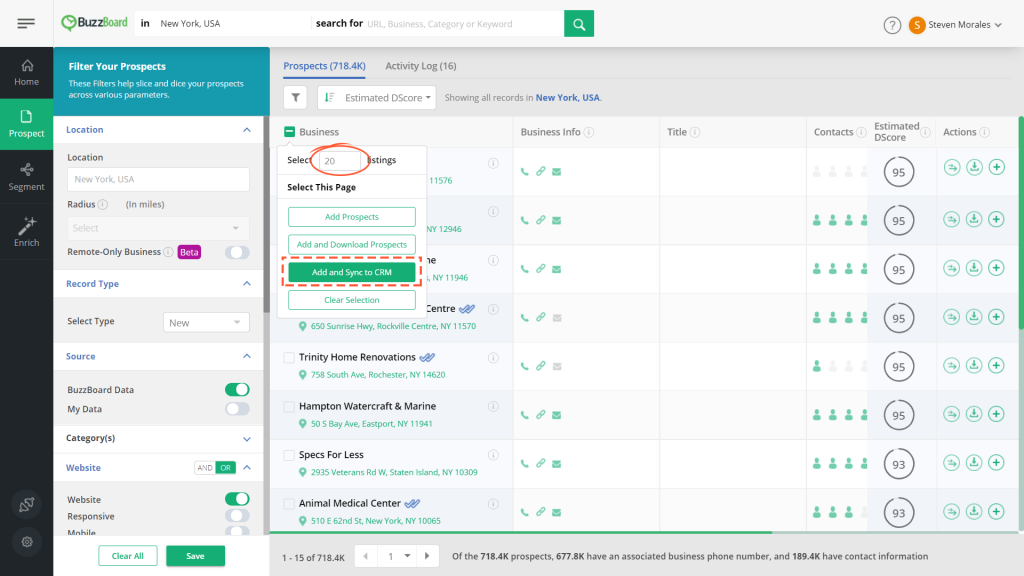
6 You will see the below popup.

7 The popup has three steps as seen in the stepper:
- Review Batch
- Assign
- Manage Duplicates

8 If you do not wish to add and sync any prospects, simply click the cross icon to close the popup and exit the process.

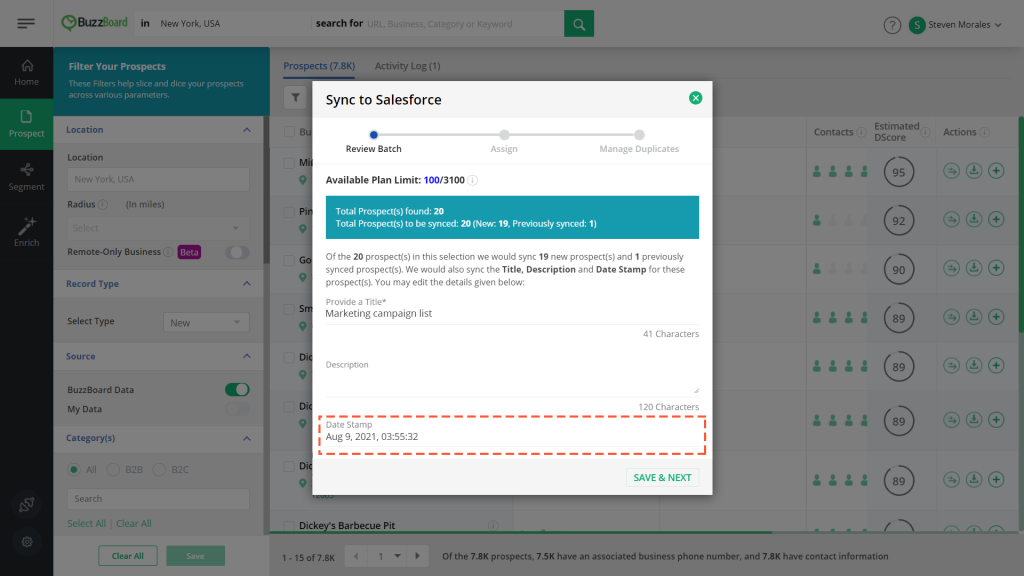
Step 1: Review Batch
1 Let us now take a look at the definitions of some of the labels here:
Label | Definition |
|---|---|
Available Plan Limit | The numerator provides the count of the total number of profiles left for this month. The denominator is the total number of profiles available each month as per your plan. |
Total Prospect(s) selected | Total number of prospects that you had entered in the textbox before clicking the Add and Sync to CRM button |
Total Prospect(s) to be synced | This number is EITHER the total number of profiles available for this month as per your plan OR the Total Prospects selected, whichever is smaller. |
2 Each sync to CRM batch represents a segment. For each prospect synced to Salesforce, we will also store the title, description and date stamp in Salesforce. We are conveying this information in the popup.

3 Click the Provide a Title and edit the pre-filled title with a title of your choice. Remember this title will be synced to CRM for all the prospects that are a part of this sync batch.

4 Provide a description in the highlighted textarea for this batch/segment.

5 The Date Stamp field is non-editable as this is system generated and depends on the date and time when the sync is initiated.
Note: This option is meant for those prospects that have not been added to your Demand account yet. In case, you wish to sync already added prospects, please check the next section.
6 Once you are done adding the details, click SAVE & NEXT.

Step 2: Assign
1 You are now on Step 2: Assign (of the sync process).
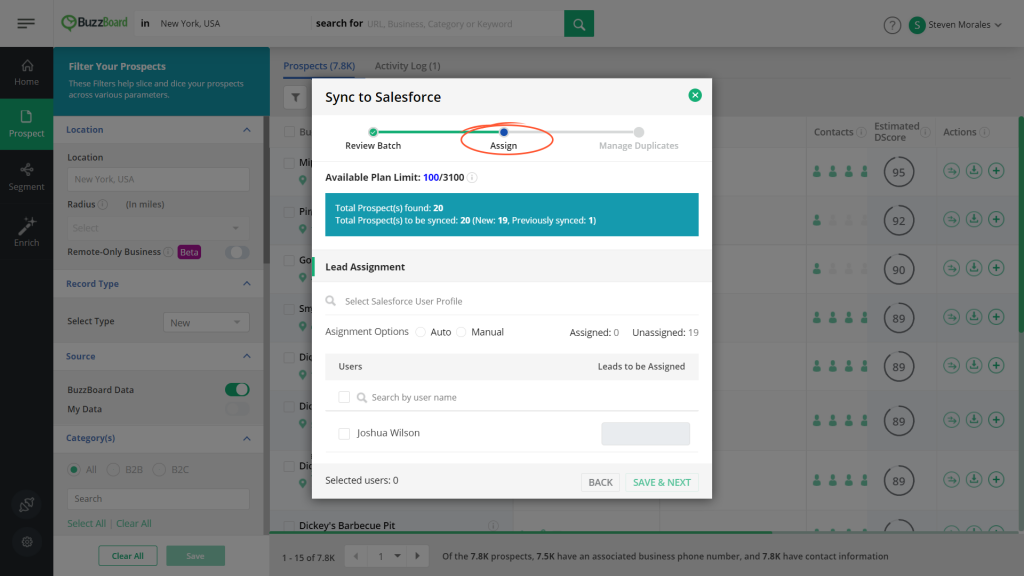
2 You will see the Lead Assignment section below. This section lets you search and select users in your Salesforce and assign prospects to those users.

3 Click on the Search Salesforce User Profile to search for the user profiles in Salesforce.
4 You will see all the user profiles from your Salesforce along with the total counts of users in each profile.
5 Click on a checkbox to select a desired user profile.
Note:
It is not mandatory to select a Salesforce user profile. If you do not wish to select any user profile, you can skip this step. We’ll display all the users across the user profiles in your Salesforce.
6 Once you are done selecting the profiles, click outside to close the dropdown. You will see the selected user profiles as shown in the bubble below. If you want to remove a user profile from the selected list, click the cross icon within that bubble.
7 The next subsection is the Lead Assignment for which there are two options – Auto and Manual.
1. Auto assignment
1Click the Auto assignment option if you want the system to distribute the number of prospects uniformly across all the selected Salesforce users.
2When you click Auto, all the users (based on your Salesforce user profile selection) will be selected by default. If you have not selected any user profile, then all the users in your Salesforce across all the profiles, will be selected by default. To view this number, check out the Selected Users count at the bottom of the page.
3If you unselect a user, the prospects get redistributed across the remaining selected Salesforce users.
4The counts against each user shows the number of prospects assigned automatically to that user. For Auto assignment option, the textboxes with the counts are disabled and cannot be edited.
5You can verify the counts for Assigned and Unassigned prospects from the below labels:
6Click SAVE & NEXT if you are ok with the Auto assignment option else, check out the next available option – Manual
2. Manual assignment
1This option lets you assign the prospects manually across the users in your Salesforce. Using this option, you can assign prospects to a desired set of users.
2Click on the Manual radio button.
3You will see that the Assigned count is 0. Also, the Selected Users count is 0.
4Select the desired user(s) by clicking the checkboxes next to their names. As soon as a checkbox is selected, the corresponding textbox will become enabled where you can enter the number of prospects.
5Enter the desired number of prospects that you wish to assign to the selected user.
6Repeat this process for other users whom you wish to assign the remaining prospects. You can change the number as well as the user any number of times in this step.
7Once you are done, click SAVE & NEXT.
8If there are any unassigned prospects, you will see a note pop-up to inform you that any unassigned prospects will not be synced to Salesforce. As mandated by Salesforce, only prospects that are assigned can be synced to Salesforce.
9Click on the cross icon in the popup to close it.
10Click SAVE & NEXT to go to the last step – Manage Duplicates.
Note:
If you chose Auto and want to edit the Assigned prospects’ counts for a handful of users, simply click on the checkbox that you want to edit. This will change the option to Manual and enable the textboxes without resetting the counts to zero. And, you’ll be able to edit only the desired counts without disturbing the other counts. Of course, you need to do your own maths but this is a great option to save your time 🙂
- Update Business Info and enrich signals for existing records – If there are any duplicate records found in Salesforce based on the dedupe logic configured, then selecting this option will update the Business Info and signal values for those records in Salesforce during the sync process.
- Enrich only signals for existing records – If there are any duplicate records found in Salesforce based on the dedupe logic configured, then selecting this option will update only the signal values for those records in Salesforce during the sync process.
- Do not update – If there are any duplicate records found in Salesforce based on the dedupe logic configured, then selecting this option will not update any of those records in Salesforce during the sync process.
4Once you have confirmed all the values, click the Sync Now button.
5You will see the below popup that says that all the prospects have been added to your Demand account and the sync has started. You will be notified via emails both on the start and completion of the sync process.
6Click STAY HERE or the cross icon if you want to close the popup and stay on the same screen.
7Click the VIEW ACTIVITY LOG button if you want to view the Activity Log. The Activity Log will have the entry for this sync activity.
8You also have the option to add and sync a single or multiple prospects, to CRM. Simply select them and click the Add and Sync to CRM action icon under the Actions column.
Multi select
Single select
9 The same 3 step popup launches where you need to provide the inputs to initiate the sync.
Option 2: Sync already added prospects to CRM
1 We are also allowing the option to sync the already added prospects to Salesforce, from the Filters >> Record type >> Added in the Prospect page.
2 Prospect page
Even here, the Sync to CRM action icon is available against each prospect so you can single select or multi select prospects and sync them to your Salesforce.
3 In all the cases, the same 3 step popup will launch when you click the Sync to CRM button or the Sync to CRM action icon.
Option 3: Sync from Activity Log
1Since all the activities get logged in Activity Log, the sync activity also gets logged there. Click the Activity Log tab.
2All the completed sync activities will be shown with a status as Synced.
3You will also see the Synced to CRM, Sync Failed and Not Synced to CRM columns with respective counts.
4You will also see the sync to CRM option against each row in the Activity Log.
5Click on the action icon to launch the same 3-step sync popup and initiate the sync process.
6To learn more about Activity Log, click here.
Option 4: Sync A Segment
1You now have the option to sync a complete segment, provided your plan limit allows you to do so. Click on the Sync to CRM icon for a desired segment.
2On clicking the sync icon, you will get the below popup where you can select to sync either all prospects in the segment or just unique ones by domain. Click on “Add & Sync All” to sync all prospects in the segment or click on “De-dupe, Add & Sync” button to sync only the unique prospects by domain. Click on Cancel if you do not want to sync the segment.
3Based on your choice in the above popup, the 3-step Sync to CRM popup will launch for the applicable prospects in the Segment.
4Once the sync process is complete, you will see the below popup. You will also receive an email when the sync starts and completes. Click on Stay Here to stay on the Segments page. Click on View Activity Log to be redirected to Activity Log. Click on View Progress to be redirected to the Enrich >> Salesforce page where you can check the progress of the sync.
5The Enrich >> Salesforce page will let you see all the in-progress and completed synced batches along with the count of new records added to your Salesforce as well as existing records updated in your Salesforce. You can also see a visual representation of the fill rate of your Salesforce before and after sync.
6Use the Sync to CRM feature to enrich your Salesforce data with a variety of BuzzBoard signals!
Note:
BuzzBoard will not bill for a prospect that has been synced before and is being re-synced to Salesforce. Each re-sync will update your leads with the fresh values from BuzzBoard based on the signals that you have configured for the sync as per this article.
